HuntExes.ps1 – check process hashes against a known malware repository

HuntExes – Extract Sysmon Event ID 1 (Process Creation) events from either the local Microsoft-Windows-Sysmon/Operational log, or archived evtx files, extract MD5, SHA1, SHA256, and IMPHASH hashes of those Processes from the sysmon log, and query Malware Bazaar (https://bazaar.abuse.ch/) to identify malicious processes.

Get it on GitHub: https://github.com/EdwardsCP/HuntExes

Summary of what HuntExes does:

  • Parse out key data elements from sysmon event 1 (Process Create) – UtcTime, Computer, Hashes, Image
  • From the Hashes, regex to parse out the MD5, SHA1, SHA256, and IMPHASH separately
  • If CSV files for storing a history of hashes don’t exist, create them: MD5Unknown, MD5Bad, SHA1Unknown, SHA1Bad, SHA256Unknown, SHA256Bad, IMPHASHUnknown, IMPHASHBad, MD5Allowlist, SHA256Allowlist, SHA256Allowlist, IMPHASHAllowlist
    • Unknown means no results were found from querying bazaar (or future virustotal integration, or whatever other services). Unknown was picked because “good” would be potentially misleading.
    • Bad means results were found and the hash matches a sample that’s reported malicious.
    • AllowList is to manually enter hashes and a comment so that HuntExes ignores them – it won’t query, the Bad or Unknown lists, or Malware Bazaar if it parses these hashes.
  • When looping through the events loaded from the Sysmon log…
    • If hash is found in the allow file, skip everything else and move on to the next hash/event
    • If hash is found in the bad file, write Alert to the console
    • If hash is found in the Unknown file, check to the datestamp of the last lookup and query Malware Bazaar again if it was more than 7 days ago. Update the lookup date if the file is still Unknown, or move the hash’s entry to the Bad file if there’s a hit.
  • If the current hash isn’t found in the local files, query Malware Bazaar.
    • If bazaar returns ‘no_results’, write the Hash to the relevant “Unknown” file.
    • If bazaar returns ‘ok’, write the hash to the bad file and Alert.

Requirements:

  • Logs must be from Sysmon version 10 or later. Version 10 added a new element, OriginalFileName, to the Process Create events. HuntExes can’t currently parse logs that don’t contain it.
  • The system running HuntExes must have Sysmon version 10 installed, otherwise get-winevent won’t retrieve any details from the events.

Previous versions of HuntExes recommended that you have MD5, SHA256, and IMPHASH algorithms enabled in your sysmon config. As of version 1.2.0, HuntExes handles SHA1 in addition to those other hashes. So it can parse every type of hash that Sysmon generates. The choice is yours.

Note: Testing has shown that an archived .evtx file is changed the first time it is read using get-winevent (which is how HuntExes reads the events). The file’s hash and LastWriteTime change, but the event data does not. Subsequent reads do not have the same effect. This is possibly due to Microsoft flipping a bit in the file to indicate it had been read, but I have not confirmed. UPDATE: This behavior is no longer being seen on my test system as of Oct 2020. Possibly changed due to a Windows update.

Screenshots from Version 1.2.0…

HuntExes.ps1 is run, it imports csv files from .\Hashes\ into tables

Example1

Several archived .evtx files are opened…

Example2

The total number of files loaded is output to the console. The total number of Events ID 1’s in the first evtx is output to the console. Events are processed, and the number of remaining events to process is output to the console every time 50 events have been completed.

Example3

When a newly detected hash is matched to Malware Bazaar, the details are output to the console. Likewise, when a hash matches one from the local Bad files/tables, the details are output to the console.

Example4

When all of the events from an evtx are finished processing, summary data about that file is output to the console. If there are additional files to process, the script moves on to loading those events.

Example5

The flowchart below is provided to help with ongoing development. It’s a general overview of how HuntExes works.

HuntExesFlow
HuntExes.ps1 – check process hashes against a known malware repository

SADPhishes.ps1 Search & Destroy Phishing Emails

I built a new tool – SADPhishes.ps1.  It’s a Powershell script to Search & Destroy emails across all Exchange mailboxes that you’ve identified as Phishing.

The script is available here: https://github.com/EdwardsCP/powershell-scripts/blob/master/SADPhishes.ps1

Below are some screenshots showing basic usage.  I’d love some feedback if you use it, improve it, or even if you think it sucks!

SADPhishes1SADPhishes2SADPhishes3SADPhishes4

SADPhishes.ps1 Search & Destroy Phishing Emails

AES encrypted credentials for Powershell scripts (and a bit about DPAPI)

I recently went through the process of learning about how you could encrypt and store passwords for user accounts in a way that they can be easily used in a Powershell script.  While researching how to do this, I found a lot of information on how to encrypt the password using Microsoft’s Data Protection Application Programming Interface (DPAPI) encryption.  However, I didn’t find very many write-ups on how to do the same thing using AES encryption.  So I’m going to share what I found and how it can be implemented.

AES? DPAPI? Why might I choose one over the other?

Before getting to the details for implementation, I want to mention some reasons why you may (or may not) want to use AES instead of DPAPI.  Both DPAPI and AES have native support in Powershell, so they can both be used relatively easily.

Data that is encrypted using DPAPI can only be decrypted on the same Host that encrypted the data (and it might even need to be the same user profile…I read a couple of things that mentioned that, but haven’t dug deeper to find out if that’s accurate or tested it).  That means that the data that’s encrypted using DPAPI isn’t portable – it can’t be decrypted on other computers (excluding potential attacks against the encryption).  Some people might find DPAPI to be appealing because its lack of portability keeps the data more secure from a Confidentiality perspective.

Data that is encrypted using AES, on the other hand, can be decrypted by any computer that has the AES key that was used to encrypt the data.  That means that the data that’s encrypted using AES is portable.  If the data needs to be migrated to another host for any reason (normal systems migrations, disaster recovery, etc), it will continue to be accessible as long as you have access to the AES key that was used.  Some people might find the portability of AES to be appealing because it keeps the encrypted data more secure from an Availability perspective.

Ultimately, whether you choose to use DPAPI or AES is a decision that each person or organization needs to make, and you need to weigh the pros and cons of each option.  In either case, if any variety of encryption is implemented without an appropriate amount of consideration, it can result in bad situations like an inability to access data that you need (effectively, a self inflicted Denial of Service attack) or the data not being as confidential as you thought because of poor access controls on the keys.

Now that we’ve covered that part, let’s move on to how you can use Powershell to (1) generate and store a 256-bit AES key, (2) encrypt the password for a User Account using that AES key, and (3) use that AES encrypted password in a script (to authenticate with a mail server, in this case).

Preparing your environment to use AES encrypted passwords

Use the Powershell below to get your environment prepared.  Before executing these steps, you will need to have: (1) a secure location to store your key, (2) a secure location to store your encrypted password, (3) the password for the User account that you need to use in your script.

#Prep Step 1 - Use Powershell to Generate a 256-Bit Key and store it in a given path
#            - For this step, you need to identify a secure location to store your Key.  It is critical that you limit access to this location using ACLs.
$KeyStoragePath = "c:\YourKeyStorage   OR   \\FileServer01\KeyStorageShare"
$KeyFileName = "Username@YourDomainDotCom.AES.Key"
$CreateKey = New-Object Byte[] 32
[Security.Cryptography.RNGCryptoServiceProvider]::Create().GetBytes($CreateKey)
$CreateKey | out-file "$KeyStoragePath\$KeyFileName"

#Prep Step 2 - Capture the password for your User Account as a Secure String, AES Encrypt it using the Key generated in Step 1, and save it to a file.
#            - For this step, you need to identify a secure location to store your encrypted Password.  Although this password is encrypted, you should still limit access to this location using ACLs.
#            - Complete this step immediately after Prep Step 1.  It relies on variables that were defined in Prep Step 1.
#            - After the 4th line below is executed, you will need to type the password for your user account (Username@YourDomainDotCom) at Powershell's Read-Host prompt.
$GetKey = Get-Content "$KeyStoragePath\$KeyFileName"
$CredentialsStoragePath = "C:\YourEncryptedCredentialsStorage   OR   \\FileServer02\CredentialsStorageShare"
$CredentialsFileName = "Username@YourDomainDotCom.securestring"
$PasswordSecureString = Read-Host -AsSecureString
$PasswordSecureString | ConvertFrom-SecureString -key $GetKey | Out-File -FilePath "$CredentialsStoragePath\$CredentialsFileName"


The screenshot below shows Prep Step 1.  A 256-Bit (32-Byte) key is generated using a .NET Random Number Generator.  For demonstration purposes, the contents of the key file is displayed.

Prep Step 1

The screenshot below shows Prep Step 2.  The password for “Username@YourDomainDotCom” is typed into the Powershell “Read-Host -AsSecureString” prompt, and then the password is encrypted and saved to a file.  For demonstration purposes, the content of the encrypted password file is displayed.

Prep Step 2

After you complete those two Prep Steps, you will have your Key and Encrypted Password saved to files, and you will be able to use them when you execute other Powershell scripts in the future.

Using your AES Encrypted password in a script

The script below demonstrates how you can use your AES Encrypted password in a script.  In this example, the password is being used to authenticate with a Mail Server.

#Use your AES Encrypted password file to authenticate with a Mail Server. Define mail server and user, decrypt the encrypted Credentials file, using the Key File, and load it into PSCredential so it can be passed to Send-MailMessage, compose email, and send.
#Define Mail Server Details
$PSEmailServer = "Mail.YourDomainDotCom"
$SMTPPort = 587
$SMTPUsername = "Username"
#Define Key File Details
$KeyStoragePath = "c:\YourKeyStorage\"
$KeyFileName = "Username@YourDomainDotCom.AES.Key"
$GetKey = Get-Content "$KeyStoragePath\$KeyFileName"
#Define Encrypted Password File Detaisl
$CredentialsStoragePath = "C:\YourEncryptedCredentialsStorage"
$CredentialsFileName = "Username@YourDomainDotCom.securestring"
$EncryptedPasswordFile = "$CredentialsStoragePath\$CredentialsFileName"
#Use the Key to decrypt the password and load it into memory as a SecureString
$SecureStringPassword = Get-Content -Path $EncryptedPasswordFile | ConvertTo-SecureString -Key $GetKey
$EmailCredential = New-Object -TypeName System.Management.Automation.PSCredential -ArgumentList $SMTPUsername,$SecureStringPassword
#Define Email Message Options
$MailTo = "RecipientAddress@DomainDotCom"
$MailFrom = "Username@YourDomainDotCom"
$MailSubject = "Hello world"
$MailBody = "Here's the a test email that was sent using Powershell Send-MailMessage to send an email.  The Powershell Script authenticated with the sending mail server using credentials that were stored in an encrypted file and decrypted on the fly during script execution to be passed as a System.Management.Automation.PSCredential."
#Send Email
Send-MailMessage -From $MailFrom -To $MailTo -Subject $MailSubject -Body $MailBody -Port $SMTPPort -Credential $EmailCredential -UseSsl


The screenshot below shows the demonstration script excluding the “Define Email Message Options” and “Send Email” portions at the end of the script.  For demonstration purposes, it also shows what the content of the $EmailCredentials variable, a PSCredential object, looks like.  Because the password was loaded as a SecureString, the Password is displayed as “System.Security.SecureString” instead of the actual password being displayed.

Prep Step 3

I don’t show the email portion in the demonstration screenshots because I’m not using a real Mail Server and User Account for this.  But it all works as long as all of the options that you define for the Send-MailMessage command are valid for the Mail Server that you use.

Decrypting a password file to reveal the plaintext password

As a final note on this post – I mentioned earlier that controlling access to your Key is critical, because anyone that has access to the key can decrypt the data that was secured with it.  In the situation that I’m demonstrating, since the key is being used to encrypt the password for an account, if an attacker can get their hands on the Key and the encrypted password file, then they may be able to use the User Account for accessing other services on the network (in addition to authenticating with the Mail Server, as the scripts demonstrate).

So, you got your hands on the key and password file, and you want to decrypt it to recover the plaintext password?  This will do it (re-using some variables that were used in previous scripts above)

$SMTPUsername = "Username"
$KeyStoragePath = "c:\YourKeyStorage\"
$KeyFileName = "Username@YourDomainDotCom.AES.Key"
$GetKey = Get-Content "$KeyStoragePath\$KeyFileName"
$CredentialsStoragePath = "C:\YourEncryptedCredentialsStorage"
$CredentialsFileName = "Username@YourDomainDotCom.securestring"
$EncryptedPasswordFile = "$CredentialsStoragePath\$CredentialsFileName"
$SecureStringPassword = Get-Content -Path $EncryptedPasswordFile | ConvertTo-SecureString -Key $GetKey
$EmailCredential = New-Object -TypeName System.Management.Automation.PSCredential -ArgumentList $SMTPUsername,$SecureStringPassword
$EmailCredential.GetNetworkCredential().Password


The screenshot below shows that Powershell code being used to expose the plaintext password we encrypted earlier.  The password is “ThisIsMyP@ssw0rdfjaldskf;jNENROIEFDnlndlfw392fdkjslfjo3fdkNLFDSNFKJLSo32eo9#(*$)#$#(*%&NFJEI#fdklew”

Prep Step 4

AES encrypted credentials for Powershell scripts (and a bit about DPAPI)

Thoughts on the handling CVE-2018-0101 / Cisco Bug CSCvg35618

Update: 02/05/2018 – Cisco’s advisory and fixed software versions have changed.  For current info, refer to https://tools.cisco.com/security/center/content/CiscoSecurityAdvisory/cisco-sa-20180129-asa1.  The tables and fixed releases listed below are stale.  All currently recommended ASA Software versions to fix CVE-2018-0101 were published on Feb 3. If you patched before that, you need to patch again.

Original Post:

I want to rant for a few moments.  It was never my intention to use this blog as an outlet for ranting, but I don’t seem to find the time to publish much content, and I needed a place to let this out.  Maybe this doesn’t even qualify as a rant.  Either way, let’s get to it.

I want to talk about Cisco Bug ID CSCvg35618, CVE-2018-0101, which received a CVSS 3.0 score of 10.  This is the highest (most critical) rating that a vulnerability can receive.  Cisco published an advisory for this bug here on January 29, 2018 at 17:00 GMT.

The table below is pulled directly from that advisory.  It lists Cisco ASA major software versions that are affected in the column on the left, and the ASA Interim Software Version that the vulnerability was fixed in on the right.

Cisco ASA Major Release  First Fixed Release 
8.x1 Affected; migrate to 9.1.7.20 or later
9.0 Affected; migrate to 9.1.7.20 or later
9.1 9.1.7.20
9.2 9.2.4.25
9.3 Affected; migrate to 9.4.4.14 or later
9.4 9.4.4.14
9.5 Affected; migrate to 9.6.3.20 or later
9.6 9.6.3.20
9.7 9.7.1.16
9.8 9.8.2.14
9.9 9.9.1.2

The next table is something that I just put together.  It has all of the First Fixed Releases from the table above on the left, and the date that they were made available for download from Cisco’s support website on the right.

First Fixed Release   Release Date
9.1.7.20 November 15, 2017
9.2.4.25 January 8, 2018
9.4.4.14 December 8, 2017
9.6.3.20 November 28, 2017
9.7.1.16 November 10, 2017
9.8.2.14 November 10, 2017
9.9.1.2 Unavailable?

Eighty days.  Eighty days is the amount of time that passed between the earliest software version that fixed the vulnerability being released, and the advisory being published.  Eighty Days!

Other Major Release versions had interim versions released more recently, but for some versions, it was eighty days.

To reiterate – this is a critical vulnerability, with a CVSS Score of 10.  The vulnerability can result in Remote Code Execution and Denial of Service when it’s exploited.

If I were to draw a network diagram for most organizations that own Cisco ASAs, where do you think those devices are placed on that diagram?  That’s right – most of the time an ASA is at the edge of the network and accessible from the Internet.  In fact, if you have an account for Shodan (https://www.shodan.io/), go ahead and run a query “Set-Cookie: webvpn”, and you can find over 160,000 devices connected to the internet that certainly look like ASAs, and they might be running vulnerable versions of the webvpn / AnyConnect services.

I can understand some of the challenges that Cisco and their peers are up against.  But even with that, I’m not sure that customers should be willing to accept that an advisory like this can be withheld for eighty days after some fixes are already available.  Eighty days is a long time, and it’s a particularly long time for a vulnerability with a CVSS Score of 10 that affects devices that are usually directly connected to the internet.

I know what at least one person reading this is going to think – “But… the updates were available already, so you should have patched your systems in a timely manner regardless of an advisory like this being published.”  Yes, customers need to take responsibility for installing patches in a timely manner.  However, customers also need to have access to adequate information so that they can appropriately prioritize among myriad workloads.  The advisory that Cisco published on January 29, 2018 contains the information that is so critical for customers to have at their disposal.

Beyond the need for customers to have access to critical information, there is another problem that Cisco could help to resolve.  There are many customers and engineers at VARs that only install Cisco “Suggested” releases that receive a “gold star” icon to attest to their quality, stability, longevity, and adoption rate.  None of the interim releases that fix CVE-2018-0101 are “suggested” “gold star” releases.  That needs to change.  Cisco needs to do more to encourage customers and VARs to install software versions that include security fixes.

By the inherent nature of interim releases that contain critical security fixes, those releases are never going to have a “gold star” – they have not been available long enough for Cisco to attest to their quality, stability, longevity, and adoption rate.  The criteria for a release receiving the “gold star” icon needs to change, or there needs to be another icon next to the release that indicates a severity level.  With a fix for a critical vulnerability included in a release, all of the interim releases listed above would be identified as Critical releases if there were somewhere that Cisco shared that type of rating.

Transparency is important.  Share critical security information as soon as possible.  Help us protect our systems.  Strive to be a better technology partner.

Thoughts on the handling CVE-2018-0101 / Cisco Bug CSCvg35618

Powershell to search Domain Computers for Symantec Endpoint Protection version in response to Meltdown and Spectre patches (Updated with Reg Key search)

Real quick post –

Here’s some powershell to check the version of cceraser.dll on systems in an AD Domain and export the results to csv.

Import-Module ActiveDirectory

$computers = Get-ADComputer -SearchBase "OU=BaseOUForComputers,DC=YOUR,DC=DOMAIN" -filter * | Select -ExpandProperty Name
foreach ($computer in $computers) {
Get-ChildItem -Recurse -Force "\\$computer\c$\ProgramData\Symantec\Symantec Endpoint Protection\CurrentVersion\*" -include cceraser.dll -ErrorAction SilentlyContinue | %{ $_.VersionInfo } | Select-Object FileName,FileVersion | Export-Csv C:\PSSearch\FoundFiles-cceraser.csv -nti -append
}


If your environment is small enough, just look through that CSV for file versions of 117.2.0 and earlier (117.3.0.358 and greater is good), and you’ll know that you need to update/repair their Symantec Endpoint Protection definitions before you can install Microsoft’s patches.

If your environment is larger, you might want something more significant.


Update 01/09/2018 – Here’s some more useful Powershell to look for the necessary “QualityCompat” registry key that should be set if your A/V software is up to date and your A/V vendor is playing along.  (Check this doc being maintained by Kevin Beaumont / @GossiTheDog to see if your A/V vendor is playing along https://docs.google.com/spreadsheets/d/184wcDt9I9TUNFFbsAVLpzAtckQxYiuirADzf3cL42FQ/htmlview?usp=sharing&sle=true)


################### Search for MeltdownAVCompatibility Registry Keys ###################
 Import-Module PSRemoteRegistry
 Import-Module ActiveDirectory
 $computers = Get-ADComputer -SearchBase "DC=YOUR,DC=DOMAIN" -filter * | Select -ExpandProperty Name

foreach ($computer in $computers) {
 Get-RegValue -ComputerName $computer -Key 'SOFTWARE\Microsoft\Windows\CurrentVersion\QualityCompat' | Export-CSV c:\PSSearch\FoundRegKeys-MeltdownAVCompatibilityKey.csv -nti -append
}


Reference:

https://support.microsoft.com/en-us/help/4072699/important-information-regarding-the-windows-security-updates-released

https://support.symantec.com/en_US/article.TECH248545.html


Powershell to search Domain Computers for Symantec Endpoint Protection version in response to Meltdown and Spectre patches (Updated with Reg Key search)

SDProp and Password changes for Domain Admins (and other Protected Group members)

Problem: Domain Admins (and other Protected Group members) can’t set their own password

User accounts that are members of Protected Groups, such as Domain Admins, have their Access Controls Lists (ACLs) set to match the ACL of the AdminSDHolder object every 60 minutes (reference: https://technet.microsoft.com/en-us/magazine/2009.09.sdadminholder.aspx).

Because of this, those User accounts are not able to change their own password when either…

  • The password expires

Or

  • They press ctrl+alt+del and select the “change password” option

…because the Security Description Propagator (SDPROP) removes those permissions every time it runs and matches the User’s ACL to AdminSDHolder.

More Details:

When SDProp Runs, a lot of things happen (Microsoft and other sources are going to be much better for info), but a couple of things happen that are directly related to the problem described above.  I’m going to do my best to explain them below.

To start, I went into ADUC, into the Properties of my Domain Admin account, and flipped the “User cannot change password” checkbox on (applied changes) and off again (applied changes).  This will put my Domain Admin user account into a state where it can change its own password in the two scenarios that are mentioned in the “Problem” section of this document.

sdprop1

After you do that (and before SDProp runs again at its’ regular 60min interval…timing may be tough here), if you go to the Security Tab, you will notice that “Everyone” is granted the “Change password” permissions.  Now, you may be thinking to yourself – “Everyone?  That can’t be right.”  Well, it is.  This is a default entry (for objects that aren’t protected by SDAdminHolder):

The Everyone group has Change Password permissions on all computer and user objects so that unauthenticated or “anonymous” users or computers are able to change their passwords when they expire without having to be authenticated first. If the anonymous user is denied the ability to change passwords, the user would be unable to change the password without logging on. (https://support.microsoft.com/en-us/kb/242795)

Things would obviously be at a stand-still if a user with an expired password needed to log in before they were allowed to set a new password.

sdprop2

However, if you wait for SDProp to run (or force it as in screenshot below- reference end of article instructions using LDP.exe: https://technet.microsoft.com/en-us/magazine/2009.09.sdadminholder.aspx ) and wait for it to complete…

sdprop3

…SDProp removes the “Change Password” permission that’s assigned to “Everyone”

sdprop4

Proving that granting “Everyone” the “Change password” permission is all it takes:

Now that my Domain Admin account has been modified by SDProp and is unable to change its own password, let’s forget about flipping the “User cannot change password” setting.  We want to confirm that granting “Everyone” the “Change password” permission is all it takes, and there’s nothing else happening that’s preventing the change.  So just go right to the Security ACLs.  Click “Advanced” and then “Add…” search for “Everyone” and click “OK”

sdprop5

In the new Permission Entries that apply to “Everyone”, Scroll down until you see “Change password”, check the “allow” box, and click OK.

sdprop6

With that set, you will see “Everyone” has been granted the “Change Password” permission on the Security Tab for this User account.  And you can successfully log on as that user, press CTRL+ALT+DEL, and choose the “Change password” option.

Now the remaining question is – what should be done, if anything, to allow a Domain Admin (or another user account that is a member of a Protect Group) the ability to change their password without asking another Domain Admin to fix the ACL so that they are (temporarily) allowed to do it?

I haven’t seen a lot of good recommendations on solving this problem (or is it a problem?  there is good reason for SDProp to protect these accounts…).  Everything I can think of is a little “hacky”.  There should be a widely accepted fix for this.  I would be hesitant to implement any fix that’s really unique to one particular environment, because I’m concerned about ongoing supportability, and the fact that, eventually, someone else will be responsible for managing the environment and they won’t be familiar with it.

SDProp and Password changes for Domain Admins (and other Protected Group members)

Web Bugs in native Excel .xlsx files

I had a previous blog post about using the Web Bug Server and Web Bug Documents from the ADHD Distro to conduct an internal phishing campaign (for reporting on who was opening attachments only…nothing really fancy).  I was toying with Excel today, and found I was able to get an Excel file to check in to the Web Bug Server using the method described below…

The following applies to Excel 2010, and the file saved as an xlsx file.  I don’t know if the same applies to newer or older versions of Excel.  I’m assuming it does, but the steps might be slightly different.

Create a new Excel file, and Click the “Data” Tab

Click the “From Web” button, and then enter your Web Bug Server URL into the Address field.  I specified “type=xls” in the url to indicate that my Excel file phoned home to the Web Bug Server.

Click Go, then the little arrow icon in the screenshot below, and then Import

2

This will result in a cell that looks like this, and you can right-click and Edit Query to see the full URL

3

Next, go to the “Data” tab, click the down-arrow on the “Refresh All” button and select “Connection Properties…”

4

On the Connection Properties window, check the box that says “Refresh data when opening the file”.

5.jpg

Now, every time you open the file you should see this message on the bottom of the Excel window, and you will get a new hit on your Web Bug Server with type “xls” every time the Excel file is opened.

1

Edit: there is 1 caveat here.  When you open the file on a computer for the first time, Excel is going to prompt you with a Security Warning that says “Data connections have been disabled”, and give you the option to Enable them.

7

Some people may not click on the “Enable Content” button.  But entering some text in the spreadsheet to try to entice them to click it might be all it takes.  Something like “Please click the “Enable Content” button above to view {whatever your target is interested in seeing}.”  As soon as that button is clicked, the file hits the Web Bug Server.


Web Bugs in native Excel .xlsx files

Scripting to solve problems (Windows DNS Debug Logs, Splunk, Powershell)

Anyone that’s worked in or been involved in IT for any substantial amount of time knows that creating scripts, even the most simple ones, can solve a lot of your problems.

A while back, I started pulling DNS Requests Debug Logs from my Windows DNS servers in to Splunk.  Having a copy of request logs, and being able to drill down into them with Splunk, can be extremely helpful for many reasons, including if your IPS alerts you to some suspicious DNS queries and you need to find the origin.

Unfortunately, Splunk occasionally causes one of my DNS servers to be unable to write to the debug log, and the server writes Event ID 3152 to the application log.  The details that are logged say:

The DNS server was unable to open file D:\DNS Requests Log\dnsrequests.txt for write.  Most likely the file is a zone file that is already open.  Close the zone file and re-initiate zone write.

I don’t know what exactly is causing the failure, but some other people have also noticed the problem.

To work around this problem, I wrote a short Powershell script and triggered it to run (via Task Scheduler) whenever Event ID 3152 is logged.  This works well for my environment because I’m not seeing Event ID 3152 logged for any other reasons than when the DNS Server service is unable to write to the debug log.  It can also be logged due to problems writing to a zone file (https://technet.microsoft.com/en-us/library/cc735838(v=ws.10).aspx) so you should research your own environment before implementing this.  Actually, you should definitely, absolutely, always, research your own environment before you believe what some random guy on the Internet wrote.

I started out with a 1 line script to just restart the service, but on one occasion, the script triggered, and immediately logged 3152 again (probably while the originally triggered instance of the task was still running), and the DNS Server service was never able to create the new log file to write to.  So, I ended up with a script that stops the SplunkForwarder service, restarts the DNS Service, sleeps for 5 seconds, and then checks to make sure that the file exists and restarts the service again if it still doesn’t exist, and then starts SplunkForwarder.

$DNSLogPath = “D:\DNS Requests Log\dnsrequests.txt”

Stop-Service SplunkForwarder

Restart-Service DNS

Start-Sleep 5

if(!(Test-Path -Path $DNSLogPath))
{
Start-Service SplunkForwarder
}
else
{
Restart-Service DNS

Start-Sleep 5

Start-Service SplunkForwarder
}

exit

Of all things, my scripting/programming experience is the weakest, so get in touch with me if you think this is ugly and have a better way to do it!

Also, once you’ve got the script scheduled to run based on an Event Viewer trigger, you can add a second action to the Task Scheduler job that will send you an email.  That way, you know when it happens and can manually verify that the new debug log exists.

Scripting to solve problems (Windows DNS Debug Logs, Splunk, Powershell)

SourceFire Security Intelligence Feed Info

I’ve had my hands on some Cisco FireSight/FirePower gear for a few months.  I spent some time digging for some info on the SourceFire Security Intelligence Feed categories, and sources for the addresses included in the feed.  Basically, I wanted a better description for some of the categories (although most of them are self-explanatory), and i wanted to know where they were aggregating information aside from what is populated by VRT/Talos.  It wasn’t the most readily available information when I was searching for it, so I’m sharing some of what I found here.

As it turns out, if you SSH in to your FireSight (previously known as Defense Center) host and view rep_dd.yaml from the /var/sf/iprep_download/ directory, there are some longer explanations given for what each category is and the sources.  Here is a consolidated list of the sources and categories:

Sources
VRT Intelligence Service A comprehensive blacklist for enterprise users that contains information on botnets, exploit sites, malicious URLs, and other nefarious activity.This is a proprietary list of addresses that is maintained by the VRT team (now known as Talos at Cisco).
Feodo Tracker A continually updated list of all malicious Feodo/Cridex/Bugat sites catalogued at feodotracker.abuse.ch
Malware Domain List A continually updated list of all malicious URLs offered by the free service malwaredomainlist.com
Palevo Tracker A Continually updates list of all malicious Palevo sites catalogued at palevotracker.abuse.ch
SpyEye Tracker A continually updated list of all malicious SpyEye sites catalogued at spyeyetracker.abuse.ch
ZeuS Tracker A continually updated list of all malicious ZeuS sites catalogued at zeustracker.abuse.ch
Categories
Attackers Hosts that are continually scanning for vulnerabilities or attempting to exploit other systems
Bogon IP Addresses that are known to not be allocated but are sending traffic
Bots Hosts that are actively participating as part of a botnet, and are being controlled by a known botnet contoller
CnC Hosts that have been identified as the controllering servers for a known Botnet
Malware Hosts that are attempting to propogate malware or are actively attacking anyone who visits them
Open Proxy Hosts that are known to run Open Web Proxies and offer anonymous web browsing services
Open Relay Hosts that are known to offer anonymous email relaying services used by spam and phishing attackers
Phishing Hosts that are actively attempting to trick end users into entering confidential information like usernames and passwords
Response Addresses that have been repeatedly observed engaging in suspicious or malicious behaviorOr, as @JoelEsler said when I asked him on twitter – “The Response category is where we send things to die. :)  Those are specifically from the research team and are active campaigns.”
Spam Hosts that have been identified as the source of sending spam email messages
Suspicious Hosts that are displaying suspicious activity and are under active investigation
Tor Exit Nodes Hosts known to offer exit node services for the Tor Anonymizer network

This info may be blatantly obvious, but after correlating Sources to Categories:

  • Feodo Tracker addresses are always CnC
  • Malware Domain List addresses are always Malware
  • Palevo Tracker addresses are always CnC
  • Zeus Tracker addresses are always CnC, and they’re the 2nd most populated list right now
  • There are no SpyEye addresses, but I assume they would also be CnC
  • The VRT Intel list contains more addresses than any other list (by far) at over 10,000 entries, and they are from all categories with the exception of Bogon, Open Proxy, Open Relay, and Suspicious, which are each empty lists at the moment.
SourceFire Security Intelligence Feed Info

SANS Pen Test 2015 Challenge

Here is my writeup for the SANS Pen Test 2015 Challenge (https://pen-testing.sans.org/challenge2015).

Challenge 1

Alice has sent Bob an encrypted file. Find it, decrypt it, and find the secret inside.

Look in the alice.pcap file to answer this question.

Hint: Alice is often quite chatty with Bob, and phrases she references could be useful to use as passwords (or passphrases). You won’t need to use wordlists, mutation, or brute-force of any kind to decrypt the encrypted file.

Whenever I come across a pcap, and I don’t know exactly what I’m looing for,  I like open it with three different tools almost immediately – Wireshark, NetworkMiner, and Cain&Abel.  For this challenge, most of my work was done in Wireshark, but it’s worth mentioning the other two tools because they have their own unique uses (and we will use Cain a little later on to get our hands on some NTLMv2 Hahses).

Start by opening alice.pcap in Wireshark.  We know that Alice and Bob like to chat, and we can see at Frame 125 that the machine with IP Address 172.16.14.138 sent a DNS query for webchat.freenode.net.  After that, we can see communication over HTTP that includes the IRC chat session.  After a little inspection, I built this Wireshark Filter to show me the most interesting parts of that HTTP communication:

http and !(frame.len == 568) and !(frame.len == 212) and !(frame.len == 221) and !(frame.len == 567)

Removing the frames with lengths 568, 212, 221, and 567 result in most of the irrelevant Protocol overhead being stripped from view

In frame 133 we see the IRC nickname “AL1C3” sent to the IRC server, so we assume that Alice’s computer is 172.16.14.138.  AL1CE joins the #shmoocon channel and proceeds to have a series of Private Messages with “I_am_Bob”.  If you parse out the conversation from the HTTP data, this is what you find:

PRIVMSG #shmoocon :I_am_Bob: Hi there, Bob! You heading off to Shmoo next weekend?

[[“c”,”PRIVMSG”,”I_am_Bob!475c7352@gateway/web/freenode/ip.71.92.115.82″,[“#shmoocon”,”AL1C3: Oh, wow, is that coming up already? I haven’t even looked at the schedule yet.”]]]

PRIVMSG #shmoocon :I_am_Bob: That’s a shame! There’s lots of excitement going on. Talks, events, labs… I even hear there’s some kind of challenge involving placeholder names used in crypto.

PRIVMSG #shmoocon :I_am_Bob: Oh, and my favorite, there’s a game going on that blends game hacking, first-person shooting, and role-playing mechanics!

[[“c”,”PRIVMSG”,”I_am_Bob!475c7352@gateway/web/freenode/ip.71.92.115.82″,[“#shmoocon”,”AL1C3: That does sound fun! I’ll definitely be there. What’s the name of that event, by the way?”]]]

PRIVMSG #shmoocon :I_am_Bob: You’ll have to check the website yourself ;)

PRIVMSG #shmoocon :I_am_Bob: By the way, I’ll send you my latest message via SMB and an encrypted zip file, per our normal protocol. Silly eavesdroppers…

PRIVMSG #shmoocon :I_am_Bob: See you soon!

[[“c”,”PRIVMSG”,”I_am_Bob!475c7352@gateway/web/freenode/ip.71.92.115.82″,[“#shmoocon”,”AL1C3: Got it, thanks!”]]]

PRIVMSG #shmoocon :I_am_Bob: My pleasure

Now we know that a file has been transferred using SMB.  In Wireshark, click File → Export Objects → SMB, and we see the “another_message.7z” that Alice referenced in her IRC message to Bob.  We also see some other very suspicious files, “not_exactly_inconspicious.exe” and “WSGvXjhn.exe”, being transferred to Bob’s PC, so we should probably save those for further analysis later.

Now that we have Alice’s encrypted zip file, we need to open it.  The hint said that phrases she references might be useful as passwords or passphrases.  At this point, I began trying words and phrases copied directly from Alice’s chat session.  Eventually, after many failed attempts, I went to www.shmoocon.org to find the game that Alice referenced as being her favorite.  That event was called “Ghost in the Shellcode”.  When that is used as a passphrase, it will decrypt the zip.

The secret is: Build It, Belay It, and Bring It On/


Challenge 2

Carol has used Firefox for Android to search for, browse, and save a particular image. A compressed copy of her /data/data/org.mozilla.firefox folder is in the question_assets folder, named “org.mozilla.firefox.tgz”. Find the serial number of the lens used to take the download picture, which is the secret for this question.

Hint: You may have to use resources outside the org.mozilla.firefox folder to fully answer this question.

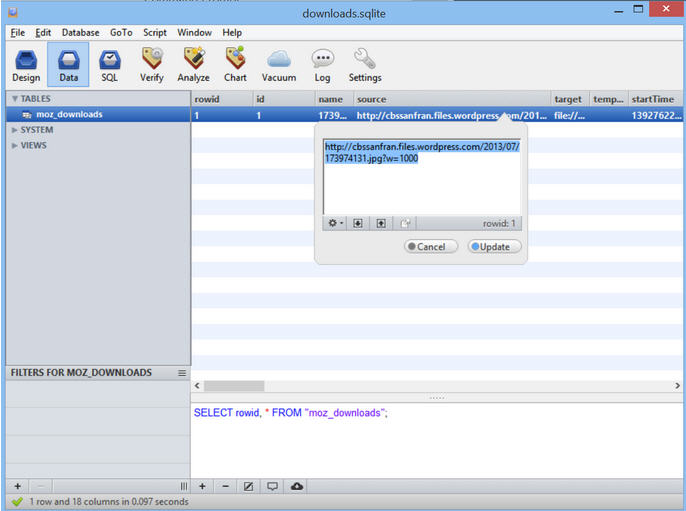
7zip can open the “org.mozilla.firefox.tgz” file, as well as the “org.mozilla.firefox.tar” that is found inside.  Once we have the uncompressed “org.mozilla.firefox” directory, we need to look for the downloads.sqlite file to look for the file she downloaded.  That file is located in \files\mozilla\9tnld04f.default, and can be opened with the free version of SQLite Manager.

When you open downloads.sqlite with SQLite Manager, and view the moz_downloads table, you can see that Carol (a fan of Star Wars, and Han Solo in particular) downloaded a photo of Harrison Ford at the 2013 Comic Con from the CBS San Francisco WordPress site:

downloads.sqlite


"Ender's Game" Press Conference

The challenge asks for the Serial Number of the Lens used to take the picture.  That information can be gathered from the exif data stored inside the 173974131.jpg file.  Download a copy of the file, and run the command below in a Terminal to display exif data.  the 64th line of the output is the Lense Serial Number.

exiftool /root/173974131.jpg

ExifTool Version Number         : 8.60

File Name                       : 173974131.jpg

Directory                       : /root

File Size                       : 362 kB

File Modification Date/Time     : 2015:02:11 20:11:38-05:00

File Permissions                : rw-r–r–

File Type                       : JPEG

MIME Type                       : image/jpeg

JFIF Version                    : 1.01

Exif Byte Order                 : Little-endian (Intel, II)

Photometric Interpretation      : RGB

Image Description               : SAN DIEGO, CA – JULY 18:  Actor Harrison Ford onstage at the “Ender’s Game” press conference during Comic-Con International 2013 at San Diego Convention Center on July 18, 2013 in San Diego, California.  (Photo by Joe Scarnici/Getty Images for Summit Entertainment)

Make                            : Canon

Camera Model Name               : Canon EOS-1D X

Orientation                     : Horizontal (normal)

Samples Per Pixel               : 3

X Resolution                    : 200

Y Resolution                    : 200

Resolution Unit                 : inches

Software                        : Adobe Photoshop CS5 Macintosh

Modify Date                     : 2013:07:19 08:42:00

Artist                          : Joe Scarnici

Y Cb Cr Positioning             : Co-sited

Copyright                       : 2013 Getty Images

Exposure Time                   : 1/160

F Number                        : 2.8

Exposure Program                : Manual

ISO                             : 3200

Sensitivity Type                : Recommended Exposure Index

Recommended Exposure Index      : 3200

Exif Version                    : 0230

Date/Time Original              : 2012:01:25 04:21:28

Create Date                     : 2012:01:25 04:21:28

Components Configuration        : Y, Cb, Cr, –

Shutter Speed Value             : 1/166

Aperture Value                  : 2.8

Exposure Compensation           : 0

Max Aperture Value              : 2.8

Subject Distance                : 7.06 m

Metering Mode                   : Multi-segment

Flash                           : Off, Did not fire

Focal Length                    : 102.0 mm

User Comment                    :

Sub Sec Time                    : 56

Sub Sec Time Original           : 56

Sub Sec Time Digitized          : 56

Flashpix Version                : 0100

Color Space                     : sRGB

Exif Image Width                : 1000

Exif Image Height               : 758

Interoperability Index          : R98 – DCF basic file (sRGB)

Interoperability Version        : 0100

Focal Plane X Resolution        : 3545.827633

Focal Plane Y Resolution        : 3526.530612

Focal Plane Resolution Unit     : inches

Custom Rendered                 : Normal

Exposure Mode                   : Manual

White Balance                   : Auto

Scene Capture Type              : Standard

Owner Name                      :

Serial Number                   : 088015001238

Lens Info                       : 70-200mm f/0

Lens Model                      : EF70-200mm f/2.8L IS II USM

Lens Serial Number              : 0000c15998

GPS Version ID                  : 2.3.0.0

Compression                     : JPEG (old-style)

Thumbnail Offset                : 1752

Thumbnail Length                : 5243

Current IPTC Digest             : 4070c4df48c719664a9df0314ac3ea16

Coded Character Set             : UTF8

Application Record Version      : 4

Caption-Abstract                : SAN DIEGO, CA – JULY 18:  Actor Harrison Ford onstage at the “Ender’s Game” press conference during Comic-Con International 2013 at San Diego Convention Center on July 18, 2013 in San Diego, California.  (Photo by Joe Scarnici/Getty Images for Summit Entertainment)

Writer-Editor                   : hg

Headline                        : “Ender’s Game” Press Conference

By-line                         : Joe Scarnici

By-line Title                   : Stringer

Credit                          : Getty Images for Summit Entertai

Source                          : Getty Images North America

Object Name                     : 174014009HG00008_Ender_s_Ga

Date Created                    : 2013:07:18

Time Created                    : 00:00:00+00:00

City                            : San Diego

Sub-location                    : San Diego Convention Center

Province-State                  : CA

Country-Primary Location Name   : United States

Country-Primary Location Code   : USA

Original Transmission Reference : 174014009

Category                        : E

Supplemental Categories         : ACE, CEL, ENT

Urgency                         : 2

Keywords                        : Celebrities

Copyright Notice                : 2013 Getty Images

IPTC Digest                     : 4070c4df48c719664a9df0314ac3ea16

Displayed Units X               : inches

Displayed Units Y               : inches

Global Angle                    : 30

Global Altitude                 : 30

Photoshop Thumbnail             : (Binary data 5243 bytes, use -b option to extract)

Photoshop Quality               : 12

Photoshop Format                : Standard

Progressive Scans               : 3 Scans

Profile CMM Type                : Lino

Profile Version                 : 2.1.0

Profile Class                   : Display Device Profile

Color Space Data                : RGB

Profile Connection Space        : XYZ

Profile Date Time               : 1998:02:09 06:49:00

Profile File Signature          : acsp

Primary Platform                : Microsoft Corporation

CMM Flags                       : Not Embedded, Independent

Device Manufacturer             : IEC

Device Model                    : sRGB

Device Attributes               : Reflective, Glossy, Positive, Color

Rendering Intent                : Media-Relative Colorimetric

Connection Space Illuminant     : 0.9642 1 0.82491

Profile Creator                 : HP

Profile ID                      : 0

Profile Copyright               : Copyright (c) 1998 Hewlett-Packard Company

Profile Description             : sRGB IEC61966-2.1

Media White Point               : 0.95045 1 1.08905

Media Black Point               : 0 0 0

Red Matrix Column               : 0.43607 0.22249 0.01392

Green Matrix Column             : 0.38515 0.71687 0.09708

Blue Matrix Column              : 0.14307 0.06061 0.7141

Device Mfg Desc                 : IEC http://www.iec.ch

Device Model Desc               : IEC 61966-2.1 Default RGB colour space – sRGB

Viewing Cond Desc               : Reference Viewing Condition in IEC61966-2.1

Viewing Cond Illuminant         : 19.6445 20.3718 16.8089

Viewing Cond Surround           : 3.92889 4.07439 3.36179

Viewing Cond Illuminant Type    : D50

Luminance                       : 76.03647 80 87.12462

Measurement Observer            : CIE 1931

Measurement Backing             : 0 0 0

Measurement Geometry            : Unknown (0)

Measurement Flare               : 0.999%

Measurement Illuminant          : D65

Technology                      : Cathode Ray Tube Display

Red Tone Reproduction Curve     : (Binary data 2060 bytes, use -b option to extract)

Green Tone Reproduction Curve   : (Binary data 2060 bytes, use -b option to extract)

Blue Tone Reproduction Curve    : (Binary data 2060 bytes, use -b option to extract)

Image Width                     : 1000

Image Height                    : 758

Encoding Process                : Baseline DCT, Huffman coding

Bits Per Sample                 : 8

Color Components                : 3

Y Cb Cr Sub Sampling            : YCbCr4:4:4 (1 1)

Aperture                        : 2.8

Date/Time Created               : 2013:07:18 00:00:00+00:00

Image Size                      : 1000×758

Scale Factor To 35 mm Equivalent: 4.8

Shutter Speed                   : 1/160

Create Date                     : 2012:01:25 04:21:28.56

Date/Time Original              : 2012:01:25 04:21:28.56

Modify Date                     : 2013:07:19 08:42:00.56

Thumbnail Image                 : (Binary data 5243 bytes, use -b option to extract)

Circle Of Confusion             : 0.006 mm

Depth Of Field                  : 0.17 m (6.98 – 7.14)

Field Of View                   : 4.2 deg

Focal Length                    : 102.0 mm (35 mm equivalent: 490.0 mm)

Hyperfocal Distance             : 594.07 m

Light Value                     : 5.3


The Lens Serial Number is 0000c15998


Challenge 3

Dave messed up and deleted his only copy of an MP3 file. He’d really appreciate it if you could retrieve it for him – look inside svn_2015.dump.gz to get started.

Once you’ve recovered the audio file, look at it carefully to find the secret.

This file is a dump of an Apache Subversion Repository.  One way to recover data from this file is to create a new Subversion Repository and load this dump into it.  Since I don’t really need the full repo I’m going to just carve it up with a text editor. For example, if we open it in Notepad++ and scroll down to line 212, we can see that Revision 2 included an audio file named shmooster.mp3.

smoostermp3nppp

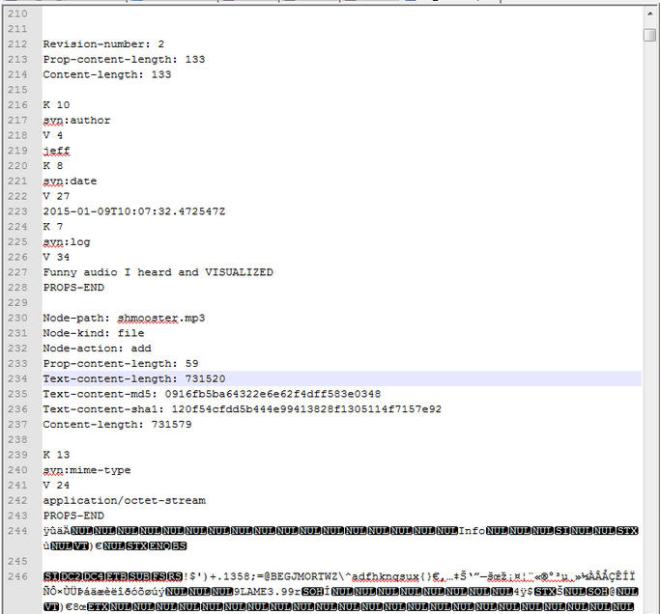
Just delete everything from the start of the file until line 243 (the “PROPS-END” line) and from until line 7326 (just before the “Revision-Number 3” line) until the end of the file, and save it as shmooster.mp3.  After you create the file, you can confirm its content by running a SHA1 or MD5 hash against it and comparing it to the results on lines 235 or 236 in the above screenshot.

When you listen to the mp3, it says:

Which of the following would you most prefer?


  • A – A puppy
  • B – A pretty flower from your sweetie

                 or

  •  C – A large properly formatted data file


                 …..

                 You have failed this Reverse Turning test.  Now suffer the consequences.  

The next few paragraphs on MP3Stego don’t actually help solve the challenge – it was a dead end, but a learning experience!

The challenge said to look at the MP3 file carefully to find the secret.  There were no ID3 tags included in the file, and no exif data of any use.  Text files can be hidden in MP3s using the MP3Stego program, and the audio portion of the file may be a hint to the password.  When you use the password is “c”, a text file is successfully extracted.  Using MP3Stego we need to execute:

Decode.exe –X –P c \path\to\shmooster.mp3

The result is:

Input file = ‘C:\path\to\shmooster.mp3’  output file = ‘mp3’

Will attempt to extract hidden information. Output: C:\path\to\shmooster.mp3.txt

the bit stream file C:\path\to\shmooster.mp3 is a BINARY file

HDR: s=FFF, id=1, l=3, ep=off, br=E, sf=1, pd=0, pr=0, m=3, js=0, c=0, o=1, e=0

alg.=MPEG-1, layer=III, tot bitrate=320, sfrq=48.0

mode=single-ch, sblim=32, jsbd=32, ch=1

Frame cannot be located

Input stream may be empty

Avg slots/frame = 960.002; b/smp = 6.67; br = 320.001 kbps

Decoding of “C:\path\to\shmooster.mp3” is finished

The decoded PCM output file name is “mp3”

The shmooster.mp3.txt file that is extracted contains the string of ASCII characters shown in the picture below.  I could not get that string to work, in combination with the other passwords, to open the open_this_to_win.zip file.  I tried almost countless manipulations by converting to Hex, Binary, Base64 encode/decode, URL encoding, etc, and could not get anything to work.

mp3stego


Is it an odd coincidence that text is successfully extracted using the password “c” with MP3Stego or did Dave intentionally embed bad information to keep his adversaries occupied with a red herring?  I talked with the challenge author about this, and it turns out that this successful text extraction was a False Positive from the MP3Stego decode program.  I attempted several other passwords before trying “c”, and all of them resulted in an error and no txt file extracted.

The real solution to Challenge 3 is to open the mp3 in Audacity and use the Spectrogram view to reveal a hidden QR code.  The settings that I used were: Windows Size: 512, Window Type: Hannning, Min Freq -, Max Freq 20000, Gain 80, Range 10, Freq Gain 1, a Grayscale Colors.  Below is a screenshot:

audacity


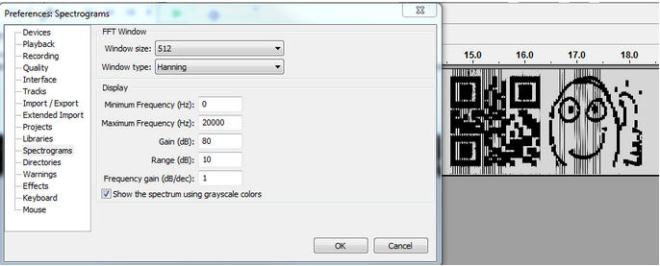
When you scan that QR code, the text “3e9cd9ea80d80606” is displayed.


The Secret in Challenge 3 is 3e9cd9ea80d80606


Challenge 4

Eve suspects that one of Alice, Bob, or Carol might not be as innocent as they seem. She’ll need your help to prove it, however. Examine the other three questions and their included files. Which user, based off their malicious behavior, might be a Cylon?

Once you know who it is, find that user’s password, which is the secret for this question.

Based on the additional files that Alice dropped on Bob’s PC, it’s fairly obvious that Alice isn’t very innocent.  At frame 1016 of the pcap, we can see that Alice started flooding Bob’s PC with TCP Resets.  We can also see in Frame 712’s DHCP request and the various SMB NTLMSSP_NEGOTIATE and NTLMSSP_AUTH frames (i.e. Frames 801, 803, 3336, 3338, etc) that Alice’s Host Name is “KALI”, which is a well-known and powerful Linux Security Distro.

If we open alice.pcap in Cain & Abel, and go to the Sniffer → Passwords Tab, we can see that Cain successfully extracted a bunch of hashes from Alice’s password from the pcap.  Unfortunately, they are NTLMv2 hashes, and cracking them (even using a very efficient tool like oclHashcat with power GPUs) is not likely to happen in a timely manner.  Out of curiosity, I did upload the hashes to an Amazon Web Services G2.2XLarge instance to see if they could be brute forced, but didn’t have any luck.  The maximum length I ran was 6 characters (which takes about 4 hours).  Beyond that, 7 characters takes a few days and 8 characters takes years.  Had Alice’s password been 6 characters or less, I could have recovered it with oclHashcat.  Below are the steps you would take to get oclHashcat running on an Amazon Web Services GPU Instance, and crack with oclHashcat:

First, you need to get an AWS account if you don’t already have one, and launch a GPU Instance (as of Feb 2015, it’s called an G2.2xlarge, and the OS it runs is Amazon Linux AMI).  As of now, it costs about $0.60 per hour to run.  Follow Amazon’s steps for authenticating to the console using SSH and a private key file (either PEM, or PPK if you’re using PuTTy).  To get oclHashcat (actually, cudaHashcat since we’re using nVidia GPUs) running, I needed to remove the nVidia driver that’s pre-installed, and install a driver directly from nVidia.  If you don’t have a proper driver, you will receive cuModuleLoad()209 errors when you try to execute the program .  Run these commands:

First, download 7zip and cudaHashcat:

wget rpmfind.net/linux/epel/6/x86_64/p7zip-9.20.1-2.el6.x86_64.rpm

wget http://hashcat.net/files/cudaHashcat-1.32.7z

Install 7zip:

sudo rpm -ivh p7zip-9.20.1-2.el6.x86_64.rpm

extract the cudaHashcat compressed 7z file:

7za x cudaHashcat-1.32.7z

delete the driver:

sudo yum erase nvidia cudatoolkit

download the driver from nVidia and run it:

wget http://us.download.nvidia.com/XFree86/Linux-x86_64/346.35/NVIDIA-Linux-x86_64-346.35-no-compat32.run

sudo /home/ec2-user/NVIDIA-Linux-x86_64-346.35-no-compat32.run

To extract the NTLMv2 Hashes from Cain and put them in the correct format for oclHashcat, you can take the NTLMv2.LST file from Cain’s installation directory and run this AWK command against it:

awk -v OFS=”:” -F “\t” ‘{print($1,””,$2,$5,$4,$6)}’ NTLMv2.LST > ntlmv2.hashes

You can also do this manually, but running that command makes it easy (especially when dealing with many hashes).  Here is an example of the proper format for the 3 hashes captured from alice.pcap:

alice::WORKGROUP:2DE54124CD6AE7E9:9B4C4FAAE73BB434B91927D39059EBC6:010100000000000000D36B480C2CD001C0D15A626252D179000000000200140049005200520045004C004500560041004E0054000100140049005200520045004C004500560041004E0054000400140069007200720065006C006500760061006E0074000300140069007200720065006C006500760061006E00740000000000

alice::WORKGROUP:4AC21F85875D6B97:D4476C98704BDBA641BCC821F8989F31:01010000000000008014958A0C2CD0015528F305A7A5DC54000000000200140049005200520045004C004500560041004E0054000100140049005200520045004C004500560041004E0054000400140069007200720065006C006500760061006E0074000300140069007200720065006C006500760061006E00740000000000

Alice::WORKGROUP:5EFAEAF4F04A6097:3CF0C36497864E78CE870196EE82BB60:010100000000000080986CA20C2CD00159FE4022598A6747000000000200140049005200520045004C004500560041004E0054000100140049005200520045004C004500560041004E0054000400140069007200720065006C006500760061006E0074000300140069007200720065006C006500760061006E0074000700080080986CA20C2CD0010900240063006900660073002F003100370032002E00310036002E00310034002E003100340036000000000000000000

Upload the NTLMv2.hashes file to your Amazon GPU instance.  I like to use WinSCP for this.

To brute force the NTLMv2 hashes with oclHashcat (implemented as a Mask Attack), using either a lowercase alpha, uppercase alpha, number, or special character in each position, you would run each of these commands (first command for a 1 character password length, second for a 2 character password length, etc.), and wait for the results:

sudo ./cudaHashcat64.bin -m5600 -a 3 ntlmv2.hashes ?a

sudo ./cudaHashcat64.bin -m5600 -a 3 ntlmv2.hashes ?a?a

sudo ./cudaHashcat64.bin -m5600 -a 3 ntlmv2.hashes ?a?a?a

sudo ./cudaHashcat64.bin -m5600 -a 3 ntlmv2.hashes ?a?a?a?a

sudo ./cudaHashcat64.bin -m5600 -a 3 ntlmv2.hashes ?a?a?a?a?a

sudo ./cudaHashcat64.bin -m5600 -a 3 ntlmv2.hashes ?a?a?a?a?a?a

oclHashcat can also perform dictionary attacks.  Since the note from Challenge 1 mentioned that Alice mentions her passwords when she chats with Bob, I built a quick dictionary from their IRC conversations.  That also didn’t result in a cracked Hash, but a dictionary file based on good reconnaissance or social engineering is always worth a try.

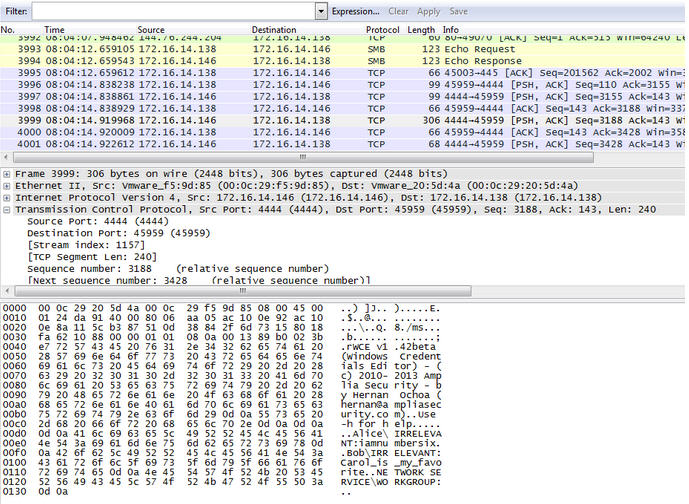
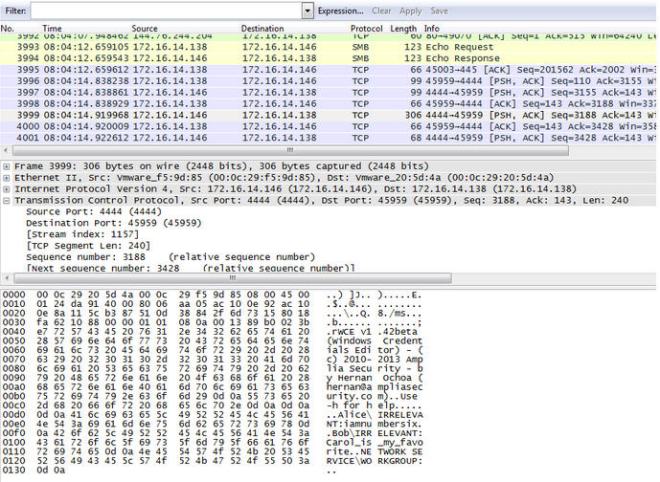
Ultimately, finding Alice’s password was accomplished by looking through the pcap file after she compromises Bob’s PC.  In Frame 3999, we can see a connection from Bob’s PC back to Alice’s PC over TCP Port 4444.  Alice is running the “not_exactly_inconspicious.exe” application, which turns out to be Windows Credentials Editor.  It reveals that Alice’s password is “iamnumbersix”.  Bob’s password is “Carol_is_my_favorite”, and Alice isn’t very happy about that.

wce

If we take Alice’s password that we just recovered, iamnumbersix, and add it to a dictionary file, we can run it through oclHashcat and crack the NTLMv2 hashes with it to confirm it is valid.

[ec2-user@ip-172-31-43-9 cudaHashcat-1.32]$ sudo ./cudaHashcat64.bin -m 5600 -a 3 ntlmv2.hashes /home/ec2-user/password.txt

cudaHashcat v1.32 starting…

Device #1: GRID K520, 4095MB, 797Mhz, 8MCU

Hashes: 3 hashes; 3 unique digests, 3 unique salts

Bitmaps: 8 bits, 256 entries, 0x000000ff mask, 1024 bytes

Applicable Optimizers:

* Zero-Byte

* Not-Iterated

* Brute-Force

Watchdog: Temperature abort trigger set to 90c

Watchdog: Temperature retain trigger set to 80c

Device #1: Kernel ./kernels/4318/m05600_a3.sm_30.64.ptx

Device #1: Kernel ./kernels/4318/markov_le_v1.64.ptx

INFO: approaching final keyspace, workload adjusted

ALICE::WORKGROUP:4ac21f85875d6b97:d4476c98704bdba641bcc821f8989f31:0101000

0000000008014958a0c2cd0015528f305a7a5dc54000000000200140049005200520045004

c004500560041004e0054000100140049005200520045004c004500560041004e005400040

0140069007200720065006c006500760061006e0074000300140069007200720065006c006

500760061006e00740000000000:iamnumbersix

ALICE::WORKGROUP:2de54124cd6ae7e9:9b4c4faae73bb434b91927d39059ebc6:0101000

00000000000d36b480c2cd001c0d15a626252d179000000000200140049005200520045004

c004500560041004e0054000100140049005200520045004c004500560041004e005400040

0140069007200720065006c006500760061006e0074000300140069007200720065006c006

500760061006e00740000000000:iamnumbersix

ALICE::WORKGROUP:5efaeaf4f04a6097:3cf0c36497864e78ce870196ee82bb60:0101000

00000000080986ca20c2cd00159fe4022598a6747000000000200140049005200520045004

c004500560041004e0054000100140049005200520045004c004500560041004e005400040

0140069007200720065006c006500760061006e0074000300140069007200720065006c006

500760061006e0074000700080080986ca20c2cd0010900240063006900660073002f00310

0370032002e00310036002e00310034002e003100340036000000000000000000:iamnumbe

rsix

Session.Name…: cudaHashcat

Status………: Cracked

Input.Mode…..: Mask (iamnumbersix) [12] (0.00%)

Hash.Target….: File (ntlmv2.hashes)

Hash.Type……: NetNTLMv2

Time.Started…: 0 secs

Speed.GPU.#1…:        0 H/s

Recovered……: 3/3 (100.00%) Digests, 3/3 (100.00%) Salts

Progress…….: 3/3 (100.00%)

Skipped……..: 0/3 (0.00%)

Rejected…….: 0/3 (0.00%)

HWMon.GPU.#1…:  0% Util, 35c Temp, -1% Fan

Started: Tue Feb 10 20:12:01 2015

Stopped: Tue Feb 10 20:12:03 2015

Alice’s password is: iamnumbersix


Open_this_to_win.zip

When you combine all of the passwords, you can decrypt the zip file using the passphrase:

Build It, Belay It, and Bring It On/0000c159983e9cd9ea80d80606iamnumbersix

And that reveals the Phrase That Pays: “The narwhal bacons at midnight.”


SANS Pen Test 2015 Challenge