HuntExes.ps1 – check process hashes against a known malware repository

HuntExes – Extract Sysmon Event ID 1 (Process Creation) events from either the local Microsoft-Windows-Sysmon/Operational log, or archived evtx files, extract MD5, SHA1, SHA256, and IMPHASH hashes of those Processes from the sysmon log, and query Malware Bazaar (https://bazaar.abuse.ch/) to identify malicious processes.

Get it on GitHub: https://github.com/EdwardsCP/HuntExes

Summary of what HuntExes does:

  • Parse out key data elements from sysmon event 1 (Process Create) – UtcTime, Computer, Hashes, Image
  • From the Hashes, regex to parse out the MD5, SHA1, SHA256, and IMPHASH separately
  • If CSV files for storing a history of hashes don’t exist, create them: MD5Unknown, MD5Bad, SHA1Unknown, SHA1Bad, SHA256Unknown, SHA256Bad, IMPHASHUnknown, IMPHASHBad, MD5Allowlist, SHA256Allowlist, SHA256Allowlist, IMPHASHAllowlist
    • Unknown means no results were found from querying bazaar (or future virustotal integration, or whatever other services). Unknown was picked because “good” would be potentially misleading.
    • Bad means results were found and the hash matches a sample that’s reported malicious.
    • AllowList is to manually enter hashes and a comment so that HuntExes ignores them – it won’t query, the Bad or Unknown lists, or Malware Bazaar if it parses these hashes.
  • When looping through the events loaded from the Sysmon log…
    • If hash is found in the allow file, skip everything else and move on to the next hash/event
    • If hash is found in the bad file, write Alert to the console
    • If hash is found in the Unknown file, check to the datestamp of the last lookup and query Malware Bazaar again if it was more than 7 days ago. Update the lookup date if the file is still Unknown, or move the hash’s entry to the Bad file if there’s a hit.
  • If the current hash isn’t found in the local files, query Malware Bazaar.
    • If bazaar returns ‘no_results’, write the Hash to the relevant “Unknown” file.
    • If bazaar returns ‘ok’, write the hash to the bad file and Alert.

Requirements:

  • Logs must be from Sysmon version 10 or later. Version 10 added a new element, OriginalFileName, to the Process Create events. HuntExes can’t currently parse logs that don’t contain it.
  • The system running HuntExes must have Sysmon version 10 installed, otherwise get-winevent won’t retrieve any details from the events.

Previous versions of HuntExes recommended that you have MD5, SHA256, and IMPHASH algorithms enabled in your sysmon config. As of version 1.2.0, HuntExes handles SHA1 in addition to those other hashes. So it can parse every type of hash that Sysmon generates. The choice is yours.

Note: Testing has shown that an archived .evtx file is changed the first time it is read using get-winevent (which is how HuntExes reads the events). The file’s hash and LastWriteTime change, but the event data does not. Subsequent reads do not have the same effect. This is possibly due to Microsoft flipping a bit in the file to indicate it had been read, but I have not confirmed. UPDATE: This behavior is no longer being seen on my test system as of Oct 2020. Possibly changed due to a Windows update.

Screenshots from Version 1.2.0…

HuntExes.ps1 is run, it imports csv files from .\Hashes\ into tables

Example1

Several archived .evtx files are opened…

Example2

The total number of files loaded is output to the console. The total number of Events ID 1’s in the first evtx is output to the console. Events are processed, and the number of remaining events to process is output to the console every time 50 events have been completed.

Example3

When a newly detected hash is matched to Malware Bazaar, the details are output to the console. Likewise, when a hash matches one from the local Bad files/tables, the details are output to the console.

Example4

When all of the events from an evtx are finished processing, summary data about that file is output to the console. If there are additional files to process, the script moves on to loading those events.

Example5

The flowchart below is provided to help with ongoing development. It’s a general overview of how HuntExes works.

HuntExesFlow
HuntExes.ps1 – check process hashes against a known malware repository

SADPhishes.ps1 Search & Destroy Phishing Emails

I built a new tool – SADPhishes.ps1.  It’s a Powershell script to Search & Destroy emails across all Exchange mailboxes that you’ve identified as Phishing.

The script is available here: https://github.com/EdwardsCP/powershell-scripts/blob/master/SADPhishes.ps1

Below are some screenshots showing basic usage.  I’d love some feedback if you use it, improve it, or even if you think it sucks!

SADPhishes1SADPhishes2SADPhishes3SADPhishes4

SADPhishes.ps1 Search & Destroy Phishing Emails

AES encrypted credentials for Powershell scripts (and a bit about DPAPI)

I recently went through the process of learning about how you could encrypt and store passwords for user accounts in a way that they can be easily used in a Powershell script.  While researching how to do this, I found a lot of information on how to encrypt the password using Microsoft’s Data Protection Application Programming Interface (DPAPI) encryption.  However, I didn’t find very many write-ups on how to do the same thing using AES encryption.  So I’m going to share what I found and how it can be implemented.

AES? DPAPI? Why might I choose one over the other?

Before getting to the details for implementation, I want to mention some reasons why you may (or may not) want to use AES instead of DPAPI.  Both DPAPI and AES have native support in Powershell, so they can both be used relatively easily.

Data that is encrypted using DPAPI can only be decrypted on the same Host that encrypted the data (and it might even need to be the same user profile…I read a couple of things that mentioned that, but haven’t dug deeper to find out if that’s accurate or tested it).  That means that the data that’s encrypted using DPAPI isn’t portable – it can’t be decrypted on other computers (excluding potential attacks against the encryption).  Some people might find DPAPI to be appealing because its lack of portability keeps the data more secure from a Confidentiality perspective.

Data that is encrypted using AES, on the other hand, can be decrypted by any computer that has the AES key that was used to encrypt the data.  That means that the data that’s encrypted using AES is portable.  If the data needs to be migrated to another host for any reason (normal systems migrations, disaster recovery, etc), it will continue to be accessible as long as you have access to the AES key that was used.  Some people might find the portability of AES to be appealing because it keeps the encrypted data more secure from an Availability perspective.

Ultimately, whether you choose to use DPAPI or AES is a decision that each person or organization needs to make, and you need to weigh the pros and cons of each option.  In either case, if any variety of encryption is implemented without an appropriate amount of consideration, it can result in bad situations like an inability to access data that you need (effectively, a self inflicted Denial of Service attack) or the data not being as confidential as you thought because of poor access controls on the keys.

Now that we’ve covered that part, let’s move on to how you can use Powershell to (1) generate and store a 256-bit AES key, (2) encrypt the password for a User Account using that AES key, and (3) use that AES encrypted password in a script (to authenticate with a mail server, in this case).

Preparing your environment to use AES encrypted passwords

Use the Powershell below to get your environment prepared.  Before executing these steps, you will need to have: (1) a secure location to store your key, (2) a secure location to store your encrypted password, (3) the password for the User account that you need to use in your script.

#Prep Step 1 - Use Powershell to Generate a 256-Bit Key and store it in a given path
#            - For this step, you need to identify a secure location to store your Key.  It is critical that you limit access to this location using ACLs.
$KeyStoragePath = "c:\YourKeyStorage   OR   \\FileServer01\KeyStorageShare"
$KeyFileName = "Username@YourDomainDotCom.AES.Key"
$CreateKey = New-Object Byte[] 32
[Security.Cryptography.RNGCryptoServiceProvider]::Create().GetBytes($CreateKey)
$CreateKey | out-file "$KeyStoragePath\$KeyFileName"

#Prep Step 2 - Capture the password for your User Account as a Secure String, AES Encrypt it using the Key generated in Step 1, and save it to a file.
#            - For this step, you need to identify a secure location to store your encrypted Password.  Although this password is encrypted, you should still limit access to this location using ACLs.
#            - Complete this step immediately after Prep Step 1.  It relies on variables that were defined in Prep Step 1.
#            - After the 4th line below is executed, you will need to type the password for your user account (Username@YourDomainDotCom) at Powershell's Read-Host prompt.
$GetKey = Get-Content "$KeyStoragePath\$KeyFileName"
$CredentialsStoragePath = "C:\YourEncryptedCredentialsStorage   OR   \\FileServer02\CredentialsStorageShare"
$CredentialsFileName = "Username@YourDomainDotCom.securestring"
$PasswordSecureString = Read-Host -AsSecureString
$PasswordSecureString | ConvertFrom-SecureString -key $GetKey | Out-File -FilePath "$CredentialsStoragePath\$CredentialsFileName"


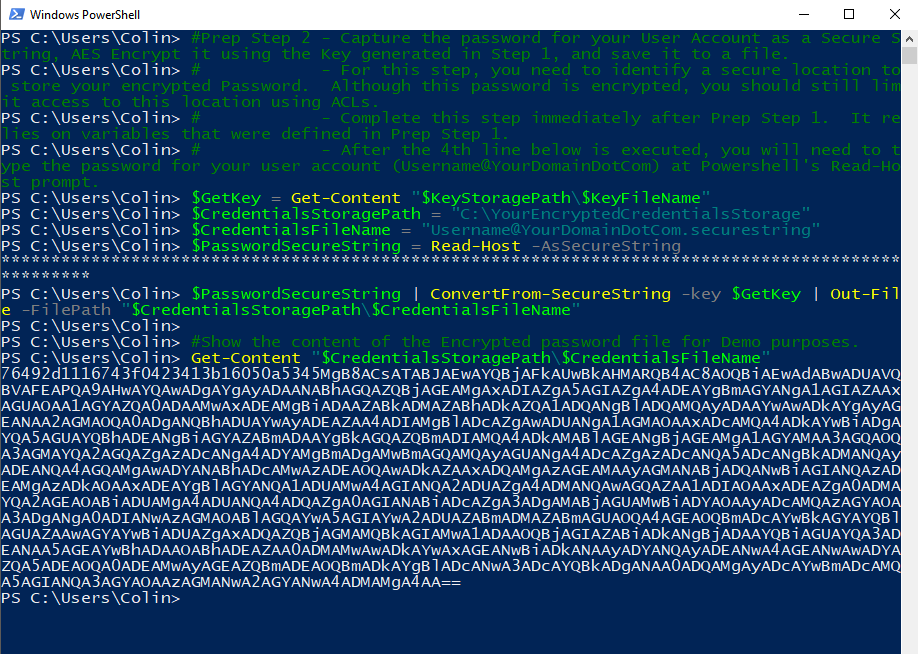
The screenshot below shows Prep Step 1.  A 256-Bit (32-Byte) key is generated using a .NET Random Number Generator.  For demonstration purposes, the contents of the key file is displayed.

Prep Step 1

The screenshot below shows Prep Step 2.  The password for “Username@YourDomainDotCom” is typed into the Powershell “Read-Host -AsSecureString” prompt, and then the password is encrypted and saved to a file.  For demonstration purposes, the content of the encrypted password file is displayed.

Prep Step 2

After you complete those two Prep Steps, you will have your Key and Encrypted Password saved to files, and you will be able to use them when you execute other Powershell scripts in the future.

Using your AES Encrypted password in a script

The script below demonstrates how you can use your AES Encrypted password in a script.  In this example, the password is being used to authenticate with a Mail Server.

#Use your AES Encrypted password file to authenticate with a Mail Server. Define mail server and user, decrypt the encrypted Credentials file, using the Key File, and load it into PSCredential so it can be passed to Send-MailMessage, compose email, and send.
#Define Mail Server Details
$PSEmailServer = "Mail.YourDomainDotCom"
$SMTPPort = 587
$SMTPUsername = "Username"
#Define Key File Details
$KeyStoragePath = "c:\YourKeyStorage\"
$KeyFileName = "Username@YourDomainDotCom.AES.Key"
$GetKey = Get-Content "$KeyStoragePath\$KeyFileName"
#Define Encrypted Password File Detaisl
$CredentialsStoragePath = "C:\YourEncryptedCredentialsStorage"
$CredentialsFileName = "Username@YourDomainDotCom.securestring"
$EncryptedPasswordFile = "$CredentialsStoragePath\$CredentialsFileName"
#Use the Key to decrypt the password and load it into memory as a SecureString
$SecureStringPassword = Get-Content -Path $EncryptedPasswordFile | ConvertTo-SecureString -Key $GetKey
$EmailCredential = New-Object -TypeName System.Management.Automation.PSCredential -ArgumentList $SMTPUsername,$SecureStringPassword
#Define Email Message Options
$MailTo = "RecipientAddress@DomainDotCom"
$MailFrom = "Username@YourDomainDotCom"
$MailSubject = "Hello world"
$MailBody = "Here's the a test email that was sent using Powershell Send-MailMessage to send an email.  The Powershell Script authenticated with the sending mail server using credentials that were stored in an encrypted file and decrypted on the fly during script execution to be passed as a System.Management.Automation.PSCredential."
#Send Email
Send-MailMessage -From $MailFrom -To $MailTo -Subject $MailSubject -Body $MailBody -Port $SMTPPort -Credential $EmailCredential -UseSsl


The screenshot below shows the demonstration script excluding the “Define Email Message Options” and “Send Email” portions at the end of the script.  For demonstration purposes, it also shows what the content of the $EmailCredentials variable, a PSCredential object, looks like.  Because the password was loaded as a SecureString, the Password is displayed as “System.Security.SecureString” instead of the actual password being displayed.

Prep Step 3

I don’t show the email portion in the demonstration screenshots because I’m not using a real Mail Server and User Account for this.  But it all works as long as all of the options that you define for the Send-MailMessage command are valid for the Mail Server that you use.

Decrypting a password file to reveal the plaintext password

As a final note on this post – I mentioned earlier that controlling access to your Key is critical, because anyone that has access to the key can decrypt the data that was secured with it.  In the situation that I’m demonstrating, since the key is being used to encrypt the password for an account, if an attacker can get their hands on the Key and the encrypted password file, then they may be able to use the User Account for accessing other services on the network (in addition to authenticating with the Mail Server, as the scripts demonstrate).

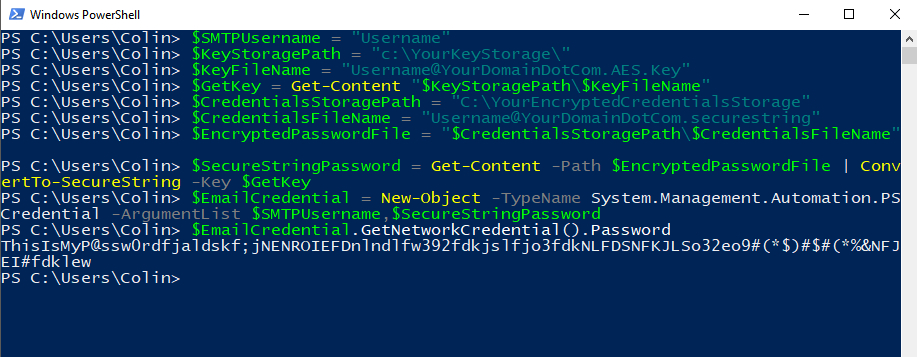
So, you got your hands on the key and password file, and you want to decrypt it to recover the plaintext password?  This will do it (re-using some variables that were used in previous scripts above)

$SMTPUsername = "Username"
$KeyStoragePath = "c:\YourKeyStorage\"
$KeyFileName = "Username@YourDomainDotCom.AES.Key"
$GetKey = Get-Content "$KeyStoragePath\$KeyFileName"
$CredentialsStoragePath = "C:\YourEncryptedCredentialsStorage"
$CredentialsFileName = "Username@YourDomainDotCom.securestring"
$EncryptedPasswordFile = "$CredentialsStoragePath\$CredentialsFileName"
$SecureStringPassword = Get-Content -Path $EncryptedPasswordFile | ConvertTo-SecureString -Key $GetKey
$EmailCredential = New-Object -TypeName System.Management.Automation.PSCredential -ArgumentList $SMTPUsername,$SecureStringPassword
$EmailCredential.GetNetworkCredential().Password


The screenshot below shows that Powershell code being used to expose the plaintext password we encrypted earlier.  The password is “ThisIsMyP@ssw0rdfjaldskf;jNENROIEFDnlndlfw392fdkjslfjo3fdkNLFDSNFKJLSo32eo9#(*$)#$#(*%&NFJEI#fdklew”

Prep Step 4

AES encrypted credentials for Powershell scripts (and a bit about DPAPI)

Powershell to search Domain Computers for Symantec Endpoint Protection version in response to Meltdown and Spectre patches (Updated with Reg Key search)

Real quick post –

Here’s some powershell to check the version of cceraser.dll on systems in an AD Domain and export the results to csv.

Import-Module ActiveDirectory

$computers = Get-ADComputer -SearchBase "OU=BaseOUForComputers,DC=YOUR,DC=DOMAIN" -filter * | Select -ExpandProperty Name
foreach ($computer in $computers) {
Get-ChildItem -Recurse -Force "\\$computer\c$\ProgramData\Symantec\Symantec Endpoint Protection\CurrentVersion\*" -include cceraser.dll -ErrorAction SilentlyContinue | %{ $_.VersionInfo } | Select-Object FileName,FileVersion | Export-Csv C:\PSSearch\FoundFiles-cceraser.csv -nti -append
}


If your environment is small enough, just look through that CSV for file versions of 117.2.0 and earlier (117.3.0.358 and greater is good), and you’ll know that you need to update/repair their Symantec Endpoint Protection definitions before you can install Microsoft’s patches.

If your environment is larger, you might want something more significant.


Update 01/09/2018 – Here’s some more useful Powershell to look for the necessary “QualityCompat” registry key that should be set if your A/V software is up to date and your A/V vendor is playing along.  (Check this doc being maintained by Kevin Beaumont / @GossiTheDog to see if your A/V vendor is playing along https://docs.google.com/spreadsheets/d/184wcDt9I9TUNFFbsAVLpzAtckQxYiuirADzf3cL42FQ/htmlview?usp=sharing&sle=true)


################### Search for MeltdownAVCompatibility Registry Keys ###################
 Import-Module PSRemoteRegistry
 Import-Module ActiveDirectory
 $computers = Get-ADComputer -SearchBase "DC=YOUR,DC=DOMAIN" -filter * | Select -ExpandProperty Name

foreach ($computer in $computers) {
 Get-RegValue -ComputerName $computer -Key 'SOFTWARE\Microsoft\Windows\CurrentVersion\QualityCompat' | Export-CSV c:\PSSearch\FoundRegKeys-MeltdownAVCompatibilityKey.csv -nti -append
}


Reference:

https://support.microsoft.com/en-us/help/4072699/important-information-regarding-the-windows-security-updates-released

https://support.symantec.com/en_US/article.TECH248545.html


Powershell to search Domain Computers for Symantec Endpoint Protection version in response to Meltdown and Spectre patches (Updated with Reg Key search)

Scripting to solve problems (Windows DNS Debug Logs, Splunk, Powershell)

Anyone that’s worked in or been involved in IT for any substantial amount of time knows that creating scripts, even the most simple ones, can solve a lot of your problems.

A while back, I started pulling DNS Requests Debug Logs from my Windows DNS servers in to Splunk.  Having a copy of request logs, and being able to drill down into them with Splunk, can be extremely helpful for many reasons, including if your IPS alerts you to some suspicious DNS queries and you need to find the origin.

Unfortunately, Splunk occasionally causes one of my DNS servers to be unable to write to the debug log, and the server writes Event ID 3152 to the application log.  The details that are logged say:

The DNS server was unable to open file D:\DNS Requests Log\dnsrequests.txt for write.  Most likely the file is a zone file that is already open.  Close the zone file and re-initiate zone write.

I don’t know what exactly is causing the failure, but some other people have also noticed the problem.

To work around this problem, I wrote a short Powershell script and triggered it to run (via Task Scheduler) whenever Event ID 3152 is logged.  This works well for my environment because I’m not seeing Event ID 3152 logged for any other reasons than when the DNS Server service is unable to write to the debug log.  It can also be logged due to problems writing to a zone file (https://technet.microsoft.com/en-us/library/cc735838(v=ws.10).aspx) so you should research your own environment before implementing this.  Actually, you should definitely, absolutely, always, research your own environment before you believe what some random guy on the Internet wrote.

I started out with a 1 line script to just restart the service, but on one occasion, the script triggered, and immediately logged 3152 again (probably while the originally triggered instance of the task was still running), and the DNS Server service was never able to create the new log file to write to.  So, I ended up with a script that stops the SplunkForwarder service, restarts the DNS Service, sleeps for 5 seconds, and then checks to make sure that the file exists and restarts the service again if it still doesn’t exist, and then starts SplunkForwarder.

$DNSLogPath = “D:\DNS Requests Log\dnsrequests.txt”

Stop-Service SplunkForwarder

Restart-Service DNS

Start-Sleep 5

if(!(Test-Path -Path $DNSLogPath))
{
Start-Service SplunkForwarder
}
else
{
Restart-Service DNS

Start-Sleep 5

Start-Service SplunkForwarder
}

exit

Of all things, my scripting/programming experience is the weakest, so get in touch with me if you think this is ugly and have a better way to do it!

Also, once you’ve got the script scheduled to run based on an Event Viewer trigger, you can add a second action to the Task Scheduler job that will send you an email.  That way, you know when it happens and can manually verify that the new debug log exists.

Scripting to solve problems (Windows DNS Debug Logs, Splunk, Powershell)